
Unencrypted hard drives can easily be accessed if stolen or lost. Your account password only prevents somebody from logging in while you are away from your machine. This is why every hard drive should be fully encrypted. This article goes in detail into the LUKS full hard drive encryption on Linux and provides instructions to set the encryption up, to decrypt with GPG smart cards, and what to do in an emergency.
The first part gives an overview of what this encryption entails and what is done. Then there will be step-by-step instruction on how to install your new Linux computer (here using PureOS, but should be fairly adoptable to Debian in general). We will then discuss how to set up a smart card device, e.g., a Librem Key or a YubiKey with OpenPGP and how to use this key to decrypt you drive on boot. Finally, emergency situations will be discussed, i.e., what happens if your computer dies, etc.
Important: It is crucial that you read through this article first before applying anything. Also: if anything goes wrong during hard drive encryption, you might lose all access to your data. Thus, you must have a complete backup of your data before starting!
Notes: Throughout this tutorial /dev/sda2 is used as the encrypted drive. You must replace this drive with your own device of course (as explained below).
- The gist
- Introduction
- Encrypt your drive
- Check out your current setup
- LUKS Key management
- Decrypt your LUKS drive with GPG and a smart card
- Emergencies
- Further reading and references
The gist
Before you do anything that is described here you need to (1) have a full backup of your data, (2) have read this whole page and understood the procedures and concepts, and (3) not blame me if something goes wrong. Thus, no gist for once but rather a table of contents above in case you use this article later on for reference.
Introduction
LUKS, the Linux Unified Key Setup, is a disk encryption specification that implements a platform-independent on-disk standard that can be used in various tools. The reference implementation for LUKS runs on Linux and is based on an enhanced version of cryptsetup using the DMCrypt Kernel module. Cryptsetup, used here extensively, is a tool that can be used to conveniently set-up and manage disk encryption.
LUKS overview
The LUKS1 disk format looks roughly like the following table.
| LUKS phdr | KM1 | KM2 | … | KM8 | bulk data |
First comes the LUKS partition header (phdr) followed by the eight key materials (KM1-8) and finally the encrypted bulk data. The partition header contains information about the encryption algorithm used, the key length, the checksum for the master key, and some key slot information. Every key slot has its key material section assigned; these eight sections follow the partition header. If a key slot is active, an encrypted version of the master key is stored in this key material area. As you might have guessed, the password you set is stored in one key slot and can be used to decrypt the respective key material, i.e., the master key. Setting up another key slot stores the master key in that key material as well and protects the key material with the chosen method. A detailed explanation on how the format and the individual actions work can be found here.
Compared to LUKS1, the LUKS2 format holds the LUKS header twice, which creates redundancy in case of corruption. LUKS2 encrypted partitions are thus less prone to failure. With a LUKS2 partition you can use up to 32 keys (cryptsetup implementation of LUKS, see below). While the master key in LUKS1 is protected by PBKDF2, LUKS2 makes use of Argon2. Both are so-called key derivative functions that protect weak passwords against brute-force attacks.
The cryptsetup tool
The cryptsetup tool can be used to conveniently set up and use encrypted LUKS drives. It works with both versions of LUKS and does most of work for you. Have a look at the man page for cryptsetup (type man cryptsetup in your terminal) to get an overview of the functions. Cryptsetup has to be run as root in order to do its work. The general cryptsetup commands are as following:
sudo cryptsetup <CMD> <device>
Cryptsetup is fairly quiet when it comes to human-readable feedback so it is generally a good idea to add the -v verbose flag. Various commands <CMD> are available that can be found in the manual. The <device> is the drive that you want to act on. As an example we can test if a given device (here /dev/sda2) is a LUKS encrypted device. To do so we would run the following command:
sudo cryptsetup -v isLuks /dev/sda2
This would return Command successful! if the device is a LUKS device.
Choosing a passphrase
A good passphrase should consist of a variety of characters, the more the better. For compatibility reasons it is recommended in section 1.2 of the cryptsetup FAQ page that you only use the 95 printable characters of the 128 character ASCII table for your passphrase.
As for the length of your passphrase, the cryptsetup FAQ page page has a very interesting comparison in section 5. They present a table discussing how much it would cost to break a password in 2017 (when the article was likely written). Back then they estimated that cracking a LUKS1 partition with a password of 70 bit entropy would roughly cost 600 billion US dollars. It’s 2020 now so this number has surely dropped, but 70 bit entropy when randomly selecting from 95 characters is already surpassed with an 11 character passphrase. There is really no reason to not choose more characters and make your password strong. As will be demonstrated later, you can choose a really long passphrase and keep it somewhere secure, and then in addition set up a smart card to decrypt your hard drive in a convenient fashion on a regular basis.
Encrypt your drive
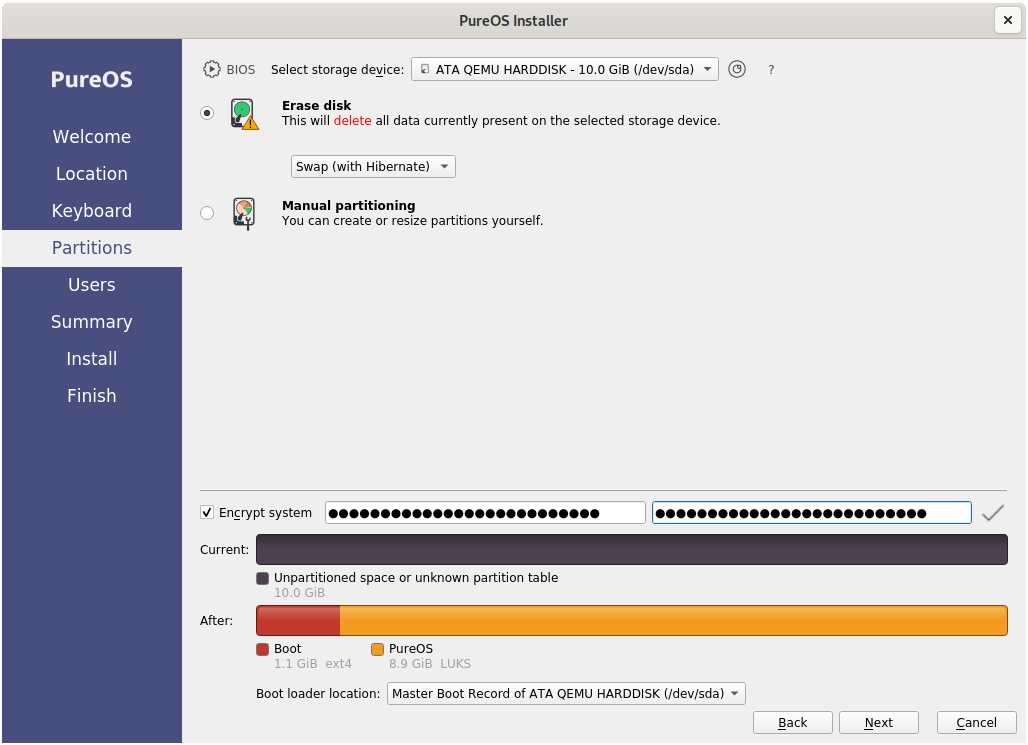
During installation of the Linux operating of your choice you should be asked when setting up the partition table if you want to encrypt your drive. Make sure you turn encryption on. An example of this can be seen on the screenshot below when installing PureOS 9.0 from the live system.
Full instructions for how to install PureOS step by step can be found here for the general applications and here for the live CD installation.
Note that post-installation encryption should also be possible, however, is fairly specific on your required setup and will not be further discussed here.
Check out your current setup
Check the disks
After you have successfully set up your encrypted system you should check to make sure everything worked before you continue. Having a look at the Gnome Disk Utility should show you something like here:
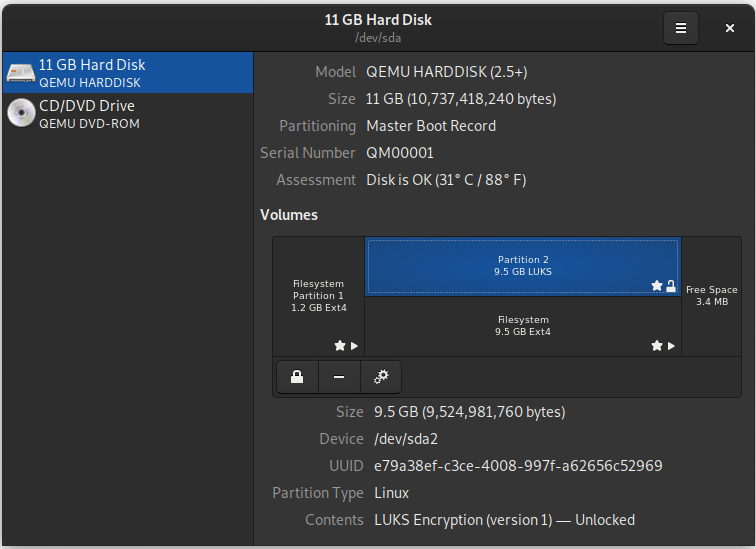
Shown here is the standard setup that was created by the PureOS installer. Partition 1 on the disk is the (unencrypted) boot partition and is mounted at /boot. Partition 2 is the LUKS encrypted partition, which is mounted as /. Since the OS is running, this disk is unlocked and decrypted.
You can also check your setup from the console by invoking the lsblk command to list all your block devices. This will give you some output that looks as following:
NAME                                          MAJ:MIN RM  SIZE RO TYPE  MOUNTPOINT
sda                                             8:0    0   10G  0 disk
├─sda1                                          8:1    0  1.1G  0 part  /boot
└─sda2                                          8:2    0  8.9G  0 part
  └─luks-e79a38ef-c3ce-4008-997f-a62656c52969 254:0    0  8.9G  0 crypt /
sr0                                            11:0    1  1.4G  0 rom
Here, sda is the one main drive in the system, sda1 and sda2 are equal to partition 1 and 2, respectively from above. Listing the block devices furthermore shows that sda2 contains the LUKS container we created.
Note: You can use the lsblk command to find the LUKS drive on your device!
A look at the LUKS header
Using the cryptsetup tool mentioned in the introduction we can have a look at the header information of the LUKS encrypted partition. The following command will show you the header:
sudo cryptsetup luksDump /dev/sda2
This will produce a result similar to this one here:
LUKS header information for /dev/sda2
Version:        1
Cipher name:    aes
Cipher mode:    xts-plain64
Hash spec:      sha256
Payload offset: 4096
MK bits:        512
MK digest:      72 ed 93 e7 32 f2 17 94 ec ce 17 26 8c c4 71 32 c6 c5 d1 35
MK salt:        62 e9 97 0f 17 25 29 0f 0b 20 27 43 91 33 2a 8b
                2c 83 1f 42 d0 32 c8 e1 e5 76 d9 8d 43 4d 45 2c
MK iterations:  118509
UUID:           e79a38ef-c3ce-4008-997f-a62656c52969

Key Slot 0: ENABLED
    Iterations:             1872456
    Salt:                   11 6f 79 38 96 69 b6 ce 1f a4 33 43 cb 5f 09 4e
                            af 5d 74 bc 1d 4b 79 36 f2 f3 01 84 5c c3 5c 44
    Key material offset:    8
    AF stripes:             4000
Key Slot 1: ENABLED
    Iterations:             1896158
    Salt:                   22 9e 8f 7b 74 1a 2a 91 2b b7 3f ec db a3 57 f6
                            c4 da 5c 13 13 a0 58 5b 98 cb f7 51 9b 16 fc 90
    Key material offset:    512
    AF stripes:             4000
Key Slot 2: DISABLED
Key Slot 3: DISABLED
Key Slot 4: DISABLED
Key Slot 5: DISABLED
Key Slot 6: DISABLED
Key Slot 7: DISABLED
First we can see that the disk was encrypted with LUKS version 1. Then we get some header information on the specific encryption. We furthermore see that two key slots are occupied, key slot 0 and key slot 1. Six more key slots are empty and available for usage.
One might wonder why two key slots are used, especially since we only set up one password during the installation. The password decrypts key slot 0 and is used during startup. Key slot 1 can be decrypted with a key file that is stored in /crypto_keyfile.bin. This key file is used for mounting all subsequent partitions and remounts. A good overview and further description can be found here.
LUKS Key management
In this section various key management tools will briefly be shown in action. The idea of this section is to give a short reference for the most commonly used commands. Note: The test setup described above is used here, i.e., /dev/sda2 is the LUKS encrypted partition.
Test a passphrase and determine its key slot
To test a passphrase and determine which key slot it unlocks you can run the command:
sudo cryptsetup --verbose open --test-passphrase /dev/sda2
You will then be prompted to enter the passphrase you want to test. Entering the passphrase that was set up during the installation shown above results in a response that says Key slot 0 unlocked. This tells us that this specific password is stored in key slot 0, a handy command to remember for later.
Add a password
As previously discussed, LUKS1 allows for a total of 8 keys to be added to decrypt your drive. In LUKS2, the number of key slots is limited by the implementation and depending on the space available for the key slots. The current cryptsetup implementation allows for 32 key slots. To add a passphrase to your LUKS device type the following into a terminal:
sudo cryptsetup luksAddKey /dev/sda2
You will be prompted to first enter an existing passphrase and then to enter the new passphrase twice. Remember / review the passphrase recommendations above. If successful you will simply be dropped back on the next prompt, if you want a success message choose the -v verbose flag in addition. This will also let you know which key slot your passphrase was created in.
Now you should test the decryption with your new password to make sure it really works (see the previous section). Do not skip this step, especially not if you remove your original key next.
Important: To replace a passphrase add a new passphrase first and then remove the old one! Always be on the safe side when it comes to replacing a passphrase and make sure you double check everything.
Remove a password
If you want to remove a passphrase use the command:
sudo cryptsetup luksRemoveKey /dev/sda2
Again, use the -v verbose flag if you want additional output. If you go for verbose output LUKS will tell you that it first unlocked a given key slot, then selected it for deletion, and finally successfully removed it. In order to make sure that the passphrase has indeed been removed you should go ahead and test it again with above mentioned command. Of course, you can also dump out the LUKS header to the terminal to double check.
Note: Your password is removed from your current header but you might still have it set in a backup header or in case you have the whole hard drive mirrored somewhere as a backup. While cryptsetup makes in fact sure that all the information is properly destroyed in the key slot if you select to delete a slot, you have to ensure that all your backups conform to the same security standard.
Decrypt your LUKS drive with GPG and a smart card
One convenient and secure way is to decrypt your drive during boot is with a GPG key stored on a smart card, e.g., a Librem Key or a YubiKey. The smart card stores a GPG key. A key file is set up to decrypt the LUKS partition with this file instead of using a passphrase. This key file is encrypted with your GPG key and the encrypted version is stored. During boot up your OS will now, instead of asking you for the LUKS passphrase, ask you to plug in your smart card with your GPG key. This smart card is secured with a PIN that you will have to enter to decrypt the key file, which will then unlock your LUKS encrypted partition. The GPG encryption can use a strong passphrase, so can your LUKS decryption passphrase. The latter you will only need in an emergency. So all you have to remember is, e.g., an eight digits PIN. The smart card limits the time between PIN retries, which makes brute force attacks difficult. Furthermore, the GPG key cannot be retrieved from the smart cards.
Set up your GPG smart card
Instruction on this subject are provided by Purism and Yubico. Here we’ll go through a mix of both set ups, however, things are pretty analog. Feel free to use the individual manuals to set up your key.
Creating GPG keys
In order to use your smart card to unlock your LUKS device with GPG you have to create GPG keys and load them onto the smart card. Once on a smart card GPG keys can only be deleted but not retrieved. YubiKeys as well as the Librem Key both support generating GPG keys directly on the key. This is the most secure method, however, it will not allow you to retain a backup of your key. I recommend the following: Get a live Linux OS, e.g., PureOS live disk and create your GPG keys on the Live OS. Of course, don’t activate any connectivity on the live OS. Add the GPG keys to your main and backup smart cards. If you want to keep the GPG keys in a secure location, put it in a veracrypt container and store it somewhere safe. That way you can recreate your smart card setup if you want to / need to. Remember, you can always fall back on your passphrase as well, so this might not be necessary.
To create a GPG key type:
gpg --expert --full-gen-key
This will start the key creation. When prompted select RSA and RSA (default) as the key you want to create. Specify 4096 as the key size and sub key size. Then specify how long your key will be valid or select 0 for unlimited validity. Enter the name, email address (or similarly formatted string), and comment that you want to associate with your key. The output will look something like this:
gpg: /home/k0dk0d/.gnupg/trustdb.gpg: trustdb created
gpg: key D177E5FAF14074DB marked as ultimately trusted
gpg: directory '/home/k0dk0d/.gnupg/openpgp-revocs.d' created
gpg: revocation certificate stored as '/home/k0dk0d/.gnupg/openpgp-revocs.d/ADC81CF782050A88ACB87320D177E5FAF14074DB.rev'
public and secret key created and signed.

pub   rsa4096 2020-05-09 [SC] [expires: 2021-05-09]
      ADC81CF782050A88ACB87320D177E5FAF14074DB
uid                      k0dk0d (TestKey) <k0d@k0d>
sub   rsa4096 2020-05-09 [E] [expires: 2021-05-09]
Create your own revocation certificate
In case you want to revoke your certificate you want to create a revocation one. To do so, go to the folder you want to store the certificate in and type:
gpg --output revocation-certificate.asc --gen-revoke k0dk0d
It will ask you a few questions that you have to answer, such as if it chose the right key (select y if so), the reason you want to create it (option 1 is usually good), any comments you might have. After entering your secret key password, you’ll get a file with the revocation certificate. Store this in a safe place.
Note: Here and in the subsequent sections, the key name k0dk0d is used. Replace this with your own key name.
Setting up your smart card: Changing the default PINs
Note: Many users generally think of PINs as numbers only. Your PIN can be any combination of numbers, letters, and symbols! Keep this in mind.
If you have never used the GPG features of your smart cardn it comes loaded with standard PINs. You should change those prior to using the key with a GPG key. To do so plug your smart card in, then see if you can detect it by typing:
gpg --card-status
If your smart card is properly detected you should see the manufacturer and some more information. At the bottom, if no GPG keys are loaded, it should look similar to this:
PIN retry counter : 3 0 3
Signature counter : 0
Signature key ....: [none]
Encryption key....: [none]
Authentication key: [none]
General key info..: [none]
No keys are currently loaded and the PIN retry counters should look as above for a new key. Your PIN retry counter should display 3 0 3. The important numbers here are the first and the last. The first number counts how many retries are left on the PIN and the last number counts the retries on the admin PIN. The middle number is a counter that is only used when a reset code is set. Reset codes are useful for commercial smart cards, however we won’t make use of them here. If you want to know more, you can read up here.
To set a new admin pin you want to enter the key editing tool by typing:
gpg --card-edit
Once you enter the tool your terminal will display gpg/card> before the prompt. You can use the command help to get menu options. To set the PIN and Admin PIN you want to first activate admin control by typing:
admin
This should give you a reply saying Admin commands are allowed. Either have a look at the menu with help or type:
passwd
This will get you to the menu for changing the PINs. You can change the default PIN (option 1) and the default Admin PIN (option 3). You can also unblock the PIN (in case you entered it too many times wrong and the counter says 0) here using option (option 2). You must know the default PINs for your device, these are usually 123456 for the PIN and 12345678 for the Admin PIN (but check your manufacturer’s descriptions in case these defaults don’t work). Follow through the menu to change the PIN and Admin PINs.
Important: If you enter your admin PIN wrong three times all GPG information on your smart card will become useless because your smart card will be completely locked. Only a factory reset can remove this lock, but the keys will be gone.
Once you are done you can quit the PIN changing menu with Q and then exit the card editing tool with quit.
Adding sub keys to your GPG key
In the step above you have created an encryption key. However, in order to use your smart card appropriately, you need to add a signature and an authentication key to your smart card.
To create those sub keys we will use the gpg tool in expert mode. You’ll need your key name, if you forgot it you can list all the gpg keys with gpg --list-secret-keys (using simply --list-keys would list all the public keys in your key ring, which would contain your just created key as well, but it might be harder to find).
Then you enter the menu for editing your key by typing:
gpg --expert --edit-key k0dk0d
Of course, you want to replace k0dk0d with your chosen key name. This should display your key information and bring you into a command line interface that starts with gpg>. To add a signing sub key type the following commands into the terminal and confirm with enter (we’ll go through them individually below):
addkey
4
4096
0
We create a new key by calling addkey. The type of key we want to add is a (4) RSA (sign only) (thus the 4). The encryption key is 4096 bits long, so we choose the same signing key length. Finally, entering a 0 would select no expiration date. If you want to have your key expire, set an appropriate expiration date here. It makes some sense to choose the same settings here as you chose above.
Finally, you need to confirm twice with y that you really want to create the key and then enter your passphrase. You will also have to enter the secret for your key, e.g., your GPG pass phrase.
Next we need to create an authentication key. For this follow the following commands:
addkey
8
S
E
A
Q
4096
0
First we need to add a new key with addkey. Then select option (8) RSA (set your own capabilities) by typing 8. You should see now that by default signing and encryption are activated. The terminal will print something like this:
Possible actions for a RSA key: Sign Encrypt Authenticate
Current allowed actions: Sign Encrypt
Keep an eye on that second line especially. So we want to deactivate signing (toggle it by typing S), deactivate encryption (toggle it by typing E) and turn on authentication (toggle it by typing A). Now the allowed action should only say Authenticate. If so, quit the modifier by typing Q. Next specify the key size (here 4096 bits) and set the expiration (here 0 for no expiration). Again you’ll need to confirm the key creation by typing y and finally enter the passphrase for the key.
Listing your keys with list should now give you something like this:
sec  rsa4096/F12D2F1C6EF286FE
     created: 2020-05-31  expires: never       usage: SC
     trust: ultimate      validity: ultimate
ssb  rsa4096/1F574253688AB11A
     created: 2020-05-31  expires: never       usage: E
ssb  rsa4096/0FD129AD09E14971
     created: 2020-05-31  expires: never       usage: S
ssb  rsa4096/DBCAD6B6E1B43D08
     created: 2020-06-01  expires: never       usage: A
[ultimate] (1). k0dk0d (Testkey for Blogpost) <k0d@k0d>
Next we’ll set the trust level for our own keys to the highest level (we just created them, we can trust them) by typing:
trust
5
Again, confirm with y. Finally, save your configuration with:
save
This will drop you back onto the terminal.
Adding GPG keys to your smart card
Finally, we want to add the generated keys to our smart card. To do so, we enter the same gpg key edit menu again as above. Remember to replace k0dk0d with your key name:
gpg --expert --edit-key k0dk0d
The program should display all your keys and the just generated sub keys. Remember: E is the encryption key, S the signature key, and A the authentication key. To select / deselect a key for moving it to our smart card, you can toggle, e.g., the encryption key by typing key 1. This will add an asterisk next to the ssb and show that the key is activated. Just type key 1 again to deactivate it.
First we want to move the encryption key to the smart card. Here are the required commands:
key 1
keytocard
2
First we want to toggle the encryption key (#1) and then move it to the card. The only possible slot it should allow you to put the key is the encryption slot, which should be (2) Encryption key. You then need to enter your passphrase for the GPG key and the admin PIN for the smart card.
Next let’s move the signature key (key 2). Type the following commands:
key 1
key 2
keytocard
1
First, key 1 deselects the encryption key. Then we select the signature key by typing key 2, move it to the card with keytocard, and select the signature slot (1) Signature key for it. Finally, confirm with the passphrase and the admin PIN of the smart card.
Last, let’s move the authentication key to the smart card. Command sequence:
key 2
key 3
keytocard
3
The commands at this point should make sense to you. Note: If you save your configuration once you are done and before quitting, your transferred sub keys will be replaced with empty stubs. So don’t save these settings if you want to use your keys for other smart cards or haven’t created a backup of the .gnupg folder yet and want to do so soon! To check if everything worked we can leave the gpg editing tool with quit and check the card status with:
gpg --card-status
Now the end of this menu should display something like here to show you that the key slots are actually filled.
PIN retry counter : 3 0 3
Signature counter : 0
Signature key ....: E722 169E B0CD 5628 AC47  0247 0FD1 29AD 09E1 4971
      created ....: 2020-05-31 23:59:30
Encryption key....: BF55 B501 3307 6936 273F  B823 1F57 4253 688A B11A
      created ....: 2020-05-31 23:47:23
Authentication key: FFE4 670C 7D52 FA3C EF21  C680 DBCA D6B6 E1B4 3D08
      created ....: 2020-06-01 00:00:10
General key info..: sub  rsa4096/0FD129AD09E14971 2020-05-31 k0dk0d (Testkey for Blogpost) <k0d@k0d>
sec   rsa4096/F12D2F1C6EF286FE  created: 2020-05-31  expires: never
ssb>  rsa4096/1F574253688AB11A  created: 2020-05-31  expires: never
                                card-no: 0006 09075116
ssb>  rsa4096/0FD129AD09E14971  created: 2020-05-31  expires: never
                                card-no: 0006 09075116
ssb>  rsa4096/DBCAD6B6E1B43D08  created: 2020-06-01  expires: never
                                card-no: 0006 09075116
Exporting your public key
Finally, you want to export your GPG public key, since you will need it to later encrypt a key file that is used for your LUKS partition with it. Export your public key using:
gpg --armor --export k0dk0d > k0dk0d-public.asc
Again, you want to replace k0dk0d with your key name. The option --armor is used to allow for easy printing of the key into an ASCII format. The option --export will export the public key. Finally, this function usually prints the output to the display. Re-direct it to a file by selecting > filename.asc. Store your public key somewhere that you can access it from your main OS that you want to encrypt.
Backup your GPG folder
If you want to make sure that you don’t lose your keys you should back up your GPG folder. The easiest way to do so is to copy the whole .gnupg folder in user’s directore ~. Alternatively if you only use them to decrypt your hard drive and have a long password set up as well, you can of course also destroy the keys after they have been added to one or multiple smart cards.
Set up LUKS drive decryption with your smart card
Decrypting your LUKS drive with your smart card will be operating system dependent. The following procedure has been tested using PureOS. I expect the details to be similar to other Debian-based operating systems and plan on writing instructions soon. Keep your eyes open for a follow-up post.
Using the Purism provided script
Purism provides an excellent script for setting up smart card decryption at boot time. All you need for this is to have the scdaemon package installed and to have your public key stored somewhere. The script also tests the decryption before making it permanent. A general usage description can be found here, the updated script can be found here. Let’s go through it step by step.
First, let’s make sure that scdaemon is installed by running:
sudo apt update
sudo apt install scdaemon
This most likely shows that the package is already available.
Next let’s download the current version of Purism’s into the current folder by either downloading the smartcard-key-luks file from their website or by directly copying it with wget:
wget https://source.puri.sm/pureos/packages/smartcard-key-luks/-/raw/master/smartcard-key-luks
Make the file executable by typing:
chmod +x smartcard-key-luks
Assuming that this script is in the same folder as your GPG public key, and that your GPG public key is named k0dk0d-public.asc (meaning: replace the name with your public key name), you can now run the script by typing the following. Make sure that your smart card is inserted!
sudo ./smartcard-key-luks k0dk0d-public.asc
This routine should first ask you to unlock your smart card with the PIN you set. Then you will have to provide an old passphrase (your current passphrase) for your LUKS partition encryption. The script should properly run through and update everything.
When you reboot your computer, you will have to have your GPG card inserted. If a smart card is not inserted, you will be prompted to insert one. Once inserted, you will be prompted for your user PIN to be entered for decrypting the LUKS drive. Successful decryption will show up like this:
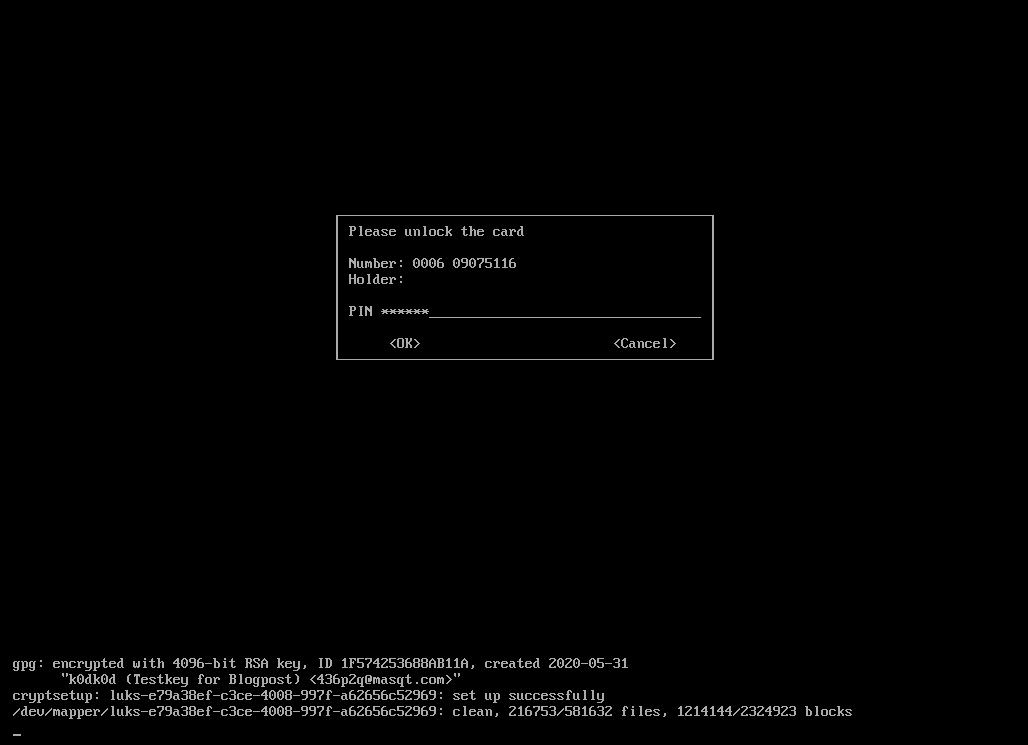
Congratulations, everything is set up now. You should continue reading though!
Is this secure?
One interesting thin I noticed, which also shows the importance of not just believing, but actually testing: You cannot lock yourself out of your smart card with the LUKS PIN entry dialog. The counter in fact never goes to zero and so the smart card never locks. I am unsure at this point why this is, more to come when I find more. The real question is though: Is this unsecure?
The LUKS prompt is rate limiting, meaning that you cannot plug in, e.g., a Rubber Ducky and try many key combinations. Actually, you can, however, the rate limiting prevents any automated process from going too fast. I briefly “measured” it by manually entering 21 wrong PINs and measure the time it took me by hand: 34 s. This makes it 1.6 s per try. Sure, an automated process might bring this down. Let’s assume 1 s per try, a password 8 characters: for simplicity we’ll only use lower case letters and numbers. This gives you 36 characters. The possible combinations are then \(36^8 \approx 2.8 \times 10^{12}\). Guessing at a rate of 1 combination per second and assuming that you have to guess half those combinations before you get the decryption to work, this will still take over 44 thousand years. Sure, I’d prefer if the card would simply lock, however, the rate limiting makes it really secure as well.
Behind the scenes of Purism’s script
Let’s have a more detailed look into the script that Purism provides. As mentioned above, this blog post will not provide a detailed view into what the script actually does but will mostly describe its general features. The reader who is interested can always follow the script directly. To facilitate this, I will point out line numbers in the current version of the script, which has the following commit SHA:
003fe29af978bc6772bf11f2173b0fe40458d116
Let’s skip error / user checking here and go into the details of what it does. It first finds the identifier for the root mounted LUKS partition (line 22) by searching the /etc/fstab file, which lists all currently available drives.
Some tests later a secret key file is created (line 84) and encrypted with the encryption key on the smart card (line 85). This file is named cryptkey.gpg. Decrypting this file with the smart card is then tested (line 94), thus you must enter your smart card PIN during this process.
If successful, the secret key (not the encrypted key) is added to LUKS (line 104) as a new key. Therefore, cryptsetup prompts you to enter a LUKS decryption pass phrase. If successful, the secret is now shredded (line 111).
Finally, a new crypttab file is written (line 118) and put in place (line 119), the initial boot system updated (line 122), the GRUB config files are updated (lines 125 – 131). Then grub is updated (line 133).
Where is your key file stored?
Your cryptkey.gpg (encrypted) file is stored in:
/etc/cryptsetup-initramfs/cryptkey.gpg
Back this file up in a secure location if you wish to do so.
Revoke the smart card encryption
Revoking the smart card encryption is not an automated process and must be done manually. However, here’s a step-by-step list on how to do this. Do not reboot the computer while you are following these steps!
- Delete the file
/etc/cryptsetup-initramfs/cryptkey.gpg. While this is not strictly necessary, re-enabling the encryption with the Purism script will break the decryption with a key. So remove this file by typing:sudo rm /etc/cryptsetup-initramfs/cryptkey.gpg - Open the file
/etc/crypttabin an editor (as root). The first not commented line in that file should read something like this:luks-b6285bda-fe1f-4670-936e-e579eeae3752 UUID=b6285bda-fe1f-4670-936e-e579eeae3752 /etc/cryptsetup-initramfs/cryptkey.gpg luks,keyscript=decrypt_gnupg-scThe first entry here is the name of the encrypted partition, the second entry the name, followed by the password (here the key file) and finally the way to decrypt it (using the
decrypt_gnupg-scscript by cryptsetup). Change this line such that it looks as following:luks-b6285bda-fe1f-4670-936e-e579eeae3752 UUID=b6285bda-fe1f-4670-936e-e579eeae3752 none luksThe last two parameters must say
none lukshere. Save and exit this file. - To delete the decryption key from your LUKS header you need to know which key slot it is in. Usually your initially chosen password is in slot zero. Decryption with the
crypto_keyfile.binis generally done using key slot 1. Determine the key slot for your password(s) (should be key slot 0 if you never changed it since the installation) using the command given further above and determine the key slot the GPG key is in by exclusion. If the GPG encryption is in slot 2 then remove it by typing:sudo cryptsetup luksKillSlot /dev/sda2 2This command would delete slot 2 (the number at the end of the line) from
/dev/sda2. You will be asked to type a remaining pass phrase into the field to confirm. This is going to be your password. This also ensures that you cannot remove a pass phrase that you know. - Next we need to update the initramfs image that is used by default. To do so type:
sudo update-initramfs -u - Lastly we need to change grub back to its original setting. The content of these files is changed with perl commands to do search and replace of given patterns. For these commands we can simply turn around the replacements. Run the next four commands to undo the changes that were applied by the Purism script:
 sudo perl -pi -e 's/^GRUB_CMDLINE_LINUX_DEFAULT=(.*) nosplash noresume loglevel=3/GRUB_CMDLINE_LINUX_DEFAULT=\1 splash/' /etc/default/grub
 sudo perl -pi -e 's/GRUB_CMDLINE_LINUX_RECOVERY=\"\$GRUB_CMDLINE_LINUX_RECOVERY recovery\"/GRUB_CMDLINE_LINUX_RECOVERY=recovery/' /etc/grub.d/10_linux
 sudo perl -pi -e 's/GRUB_CMDLINE_LINUX_RECOVERY=\"\$GRUB_CMDLINE_LINUX_RECOVERY single\"/GRUB_CMDLINE_LINUX_RECOVERY=single/' /etc/grub.d/10_linux
 sudo perl -pi -e 's/  GRUB_CMDLINE_LINUX_RECOVERY \\\n//' /usr/sbin/grub-mkconfig
Finally, open the file
/etc/default/gruband delete the last line in the file, which should read something like this.GRUB_CMDLINE_LINUX_RECOVERY="cryptopts=target=luks-b6285bda-fe1f-4670-936e-e579eeae3752,source=UUID=b6285bda-fe1f-4670-936e-e579eeae3752,luks"This line was written by the
echo...command in line 126 of the Purism script.Now you are ready to update grub by typing:
sudo update-grub - Reboot your computer! You will be prompted for a passphrase and cannot unlock your computer with your GPG smart card.
Emergencies
Lost smart card
If you lose your smart card, you can always boot into your operating system with your password. Enter the GRUB boot menu, select Advanced Options [...], and boot into recovery mode. LUKS will ask for your password now to decrypt the drive. After you entered the password you can either boot into Maintenance mode by hitting enter, or boot regularly into an XServer by hitting Ctrl+d. This will start your general OSX. Now you can add a new smart card, remove your old one, etc.
Mount your LUKS drive in a Live OS
If you cannot access your account because something happened, boot into a live OS. From there you can mount your main hard drive by clicking on it from the GUI. You can type one of your passphrases and LUKS will find the key slot that fits and unlock your drive. Now you have full access to your data and can back up anything to an external hard drive before trying to fix your system.
To mount a LUKS drive from the command line we first have to create a mount point, i.e., a place where we will mount the drive to. For example, we can create a folder in /mnt called luks-drive by typing:
sudo mkdir /mnt/luks-drive
Next we decrypt the drive with cryptsetup and make it available as a device named luks-drive in /dev/mapper.
sudo cryptsetup luksOpen /dev/sda2 luks-drive
This will prompt you for your LUKS password for decryption. Finally, mount the drive by running:
sudo mount /dev/mapper/luks-drive /mnt/luks-drive/
You can now access the mounted drive.
Unblock a smart card pin
If you need to reset the user PIN counter, follow the steps that are outlined in PIN creation further up. This will reset the smart card counter.
Reset the GPG keys on the smart card
To reset the GPG keys on the smart card, enter the card-edit menu of the gpg tool, go into the admin panel, and run a factory reset. The commands are as following:
gpg --edit-card
admin
factory-reset
You’ll need to confirm this. Then leave the menu with quit. You can check if the reset was successful with gpg --card-status.
Backup and recovery of LUKS header
As mentioned before, LUKS headers, especially version 1, do not work anymore if corrupted. One way to ensure that you will not be in trouble if you end up corrupting your LUKS header by accident is by backing the header up. You can do so by running:
sudo cryptsetup luksHeaderBackup --header-backup-file ~/my_luks_header_backup /dev/sda2
This will backup your full LUKS header into a file named my_luks_header_backup in the users home folder. This file can only be read by root. You don’t want to store this header in your home folder but on an encrypted external drive ideally. That way you could restore your LUKS header using a bootable OS as well. You also want to make sure that your LUKS header is stored securely, i.e., on an encrypted external hard drive or inside a veracrypt container. To remove any trace of the LUKS header in your user’s home folder after moving it, we can run:
sudo shred -u my_luks_header_backup
Restoring a LUKS header is similarly simple. Note: If you are not sure if you have grabbed the right header to restore, back up the current one first into some file by using the command given before. To restore a header, i.e., from the file that was just created named my_luks_header_backup in the user’s home directory, type:
sudo cryptsetup luksHeaderRestore --header-backup-file ~/my_luks_header_backup /dev/sda2
You will have to confirm this command by typing YES in all capital letters. The existing LUKS header that is on the partition will be destroyed, so ensure that you either have a backup of the current header, that you have a correct, uncorrupted LUKS header in the file, or that you really just don’t care about the data on that drive. Restoring a LUKS header can be done from any operating system on any drive, just ensure that you selected the correct device and replace /dev/sda2 with your setup.
Security note: Backing up headers is important, however, remember to shred your old header backups if you end up adding and removing passphrases from your current header. Otherwise, the passphrase change can easily be undone by anybody that has access to your drive and your old LUKS header by simply restoring this old version.
What if you screw something up
DON’T PANIC! First, you have a backup (right?). Second, if your drive is currently decrypted and you can access your data, don’t reboot. Take a deep breath, remember not to panic, take another deep breath, and maybe have a sip of water.
Now it’s time to do some research. What happened? Where do you expect the problem? If it’s with cryptsetup, go look at their FAQ section online. Make sure you understand commands before you execute them.
If you just messed your GPG key up and haven’t added it to your keychain yet it’s probably fine. You likely created a new GPG key for this setup (or you have a backup). You can redo steps like these easily. Believe me, I have gone through this setup many times, not because I set up so many computers, but because I screwed it up here and there.
Finally: If all fails you have a backup, a cleanly installed system will take some time but it happens to everybody! Sometimes things go wrong, we live and learn from them.
Stay safe!
-k0dk0d
Further reading and references
- Cryptsetup
- PureOS LUKS decryption script
- DMCrypt
- Librem Key documentation
- YubiKey OpenPGP instructions
- OpenPGP card 2.0 manual (very helpful for explanations)